一、简介
KVM全程为Kernel-based Virtual Machine,依赖于HVM,Intel VT-x或者ADM的ADM-V。在KVM模块载入系统内核后,系统模式可以分为内核模式、用户模式、来宾模式三种。KVM主要有两类组件,分别为/dev/kvm和qemu进程。
- /dev/kvm:工作于hypervisor之上,在用户空间可通过ioctl()系统调用来完成VM的创建、启动等管理操作,是一个字符设备。具有创建VM、为VM分配内存、读写VCPU的寄存器、向VCPU注入中断、运行VCPU等功能。
- qemu进程:工作于用户空间,主要用于实现模拟PC机的IO设备。
二、安装KVM模块
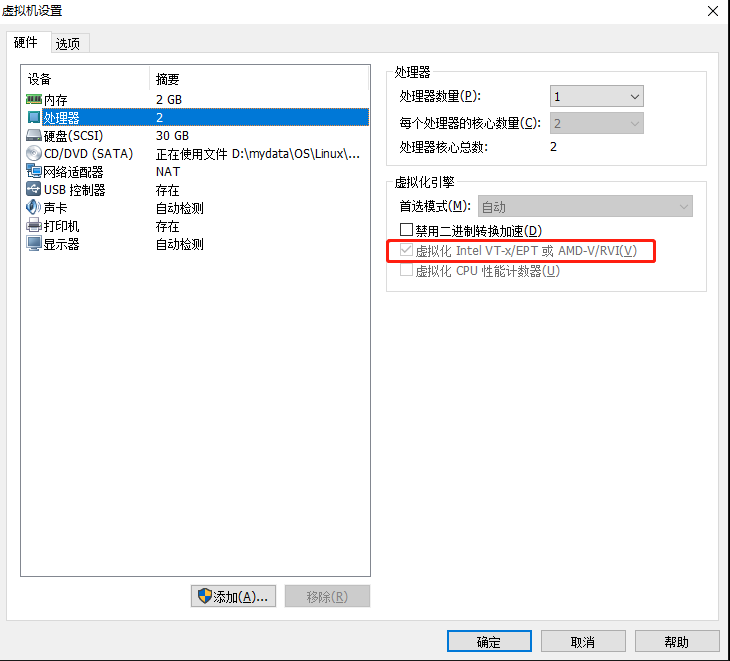
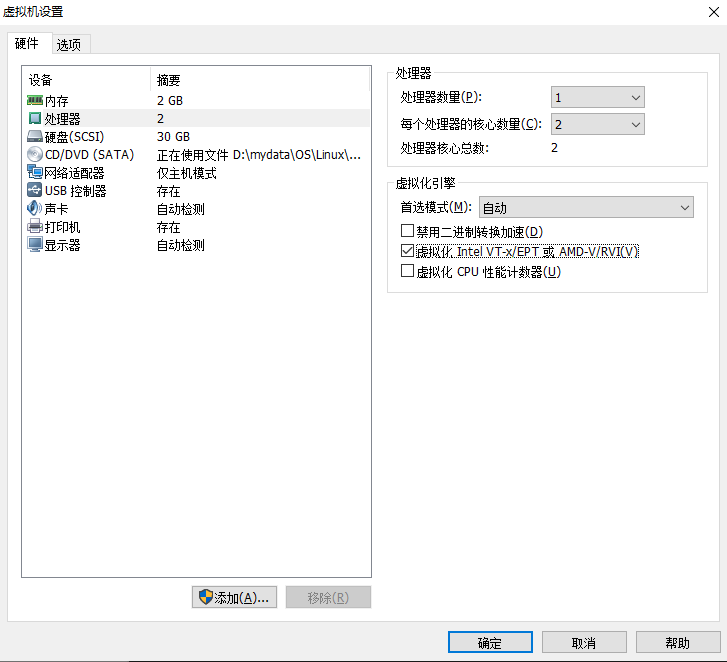
1.确保CPU支持HVM
在虚拟机的CPU处理器中开启虚拟化功能,如下图:
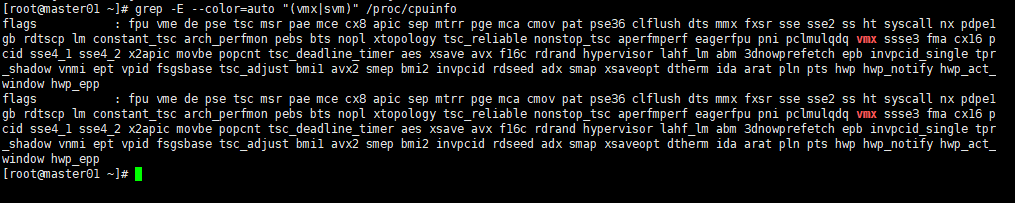
验证虚拟机是否已经支持硬件虚拟化,如下图所示,查找结果包含vmx或者svm即表明支持
[root@master01 ~]# grep -E --color=auto "(vmx|svm)" /proc/cpuinfo
2.kvm模块载入内核
查看模块kvm和kvm_intel,
[root@master01 ~]# lsmod | grep kvm
kvm_intel 188688 0
kvm 636969 1 kvm_intel
irqbypass 13503 1 kvm

[root@master01 ~]# modinfo kvm
filename:       /lib/modules/3.10.0-1127.el7.x86_64/kernel/arch/x86/kvm/kvm.ko.xz
license:        GPL
author:         Qumranet
retpoline:      Y
rhelversion:    7.8
srcversion:     E9634D92A1B0D5BFDAAA543
depends:        irqbypass
intree:         Y
vermagic:       3.10.0-1127.el7.x86_64 SMP mod_unload modversions
signer:         CentOS Linux kernel signing key
sig_key:        69:0E:8A:48:2F:E7:6B:FB:F2:31:D8:60:F0:C6:62:D8:F1:17:3D:57
sig_hashalgo:   sha256
parm:           nx_huge_pages:bool
parm:           nx_huge_pages_recovery_ratio:uint
parm:           ignore_msrs:bool
parm:           min_timer_period_us:uint
parm:           kvmclock_periodic_sync:bool
parm:           tsc_tolerance_ppm:uint
parm:           lapic_timer_advance_ns:uint
parm:           vector_hashing:bool
parm:           halt_poll_ns:uint
parm:           halt_poll_ns_grow:uint
parm:           halt_poll_ns_shrink:uint

[root@master01 ~]# modinfo kvm_intel
filename:       /lib/modules/3.10.0-1127.el7.x86_64/kernel/arch/x86/kvm/kvm-intel.ko.xz
license:        GPL
author:         Qumranet
retpoline:      Y
rhelversion:    7.8
srcversion:     1D527E2F0DBB0D63A118E23
alias:          x86cpu:vendor:*:family:*:model:*:feature:*0085*
depends:        kvm
intree:         Y
vermagic:       3.10.0-1127.el7.x86_64 SMP mod_unload modversions
signer:         CentOS Linux kernel signing key
sig_key:        69:0E:8A:48:2F:E7:6B:FB:F2:31:D8:60:F0:C6:62:D8:F1:17:3D:57
sig_hashalgo:   sha256
parm:           vpid:bool
parm:           flexpriority:bool
parm:           ept:bool
parm:           unrestricted_guest:bool
parm:           eptad:bool
parm:           emulate_invalid_guest_state:bool
parm:           vmm_exclusive:bool
parm:           fasteoi:bool
parm:           enable_apicv:bool
parm:           enable_shadow_vmcs:bool
parm:           nested:bool
parm:           pml:bool
parm:           preemption_timer:bool
parm:           ple_gap:uint
parm:           ple_window:uint
parm:           ple_window_grow:uint
parm:           ple_window_shrink:uint
parm:           ple_window_max:uint
如上所示表示内核中以被载入kvm模块,如果没有可以使用载入命令:
[root@master01 ~]# modprobe kvm
[root@master01 ~]# modprobe kvm_intel
3.验证
查看/dev/目录下包含kmv即表示可用。
4.安装kvm
[root@master01 ~]# yum install qemu-kvm -y
5.创建软连接
[root@master01 ~]# ln -sv /usr/libexec/qemu-kvm /usr/bin/
‘/usr/bin/qemu-kvm’ -> ‘/usr/libexec/qemu-kvm’
# 查看相关子命令
[root@master01 ~]# qemu-kvm --help
三、KVM常用工具:
qemu-img qemu-io qemu-kvm qemu-nbd
以上工具可分别在后面添加-h,显示命令的使用参数和方法,如下:
[root@master01 opt]# qemu-img -h
 qemu-img version 1.5.3, Copyright (c) 2004-2008 Fabrice Bellard
 usage: qemu-img command [command options]
 QEMU disk image utility
 Command syntax:
   check [-q] [-f fmt] [--output=ofmt] [-r [leaks | all]] [-T src_cache] filename
   create [-q] [-f fmt] [-o options] filename [size]
   commit [-q] [-f fmt] [-t cache] filename
   compare [-f fmt] [-F fmt] [-T src_cache] [-p] [-q] [-s] filename1 filename2
   convert [-c] [-p] [-q] [-n] [-f fmt] [-t cache] [-T src_cache] [-O output_fmt] [-o options] [-s snapshot_name] [-S sparse_size] filename [filename2 […]] output_filename
   info [-f fmt] [--output=ofmt] [--backing-chain] filename
   map [-f fmt] [--output=ofmt] filename
   snapshot [-q] [-l | -a snapshot | -c snapshot | -d snapshot] filename
   rebase [-q] [-f fmt] [-t cache] [-T src_cache] [-p] [-u] -b backing_file [-F backing_fmt] filename
   resize [-q] filename [+ | -]size
   amend [-q] [-f fmt] [-t cache] -o options filename
 Command parameters:
   'filename' is a disk image filename
   'fmt' is the disk image format. It is guessed automatically in most cases
   'cache' is the cache mode used to write the output disk image, the valid
     options are: 'none', 'writeback' (default, except for convert), 'writethrough',
     'directsync' and 'unsafe' (default for convert)
   'src_cache' is the cache mode used to read input disk images, the valid
     options are the same as for the 'cache' option
   'size' is the disk image size in bytes. Optional suffixes
     'k' or 'K' (kilobyte, 1024), 'M' (megabyte, 1024k), 'G' (gigabyte, 1024M),
     'T' (terabyte, 1024G), 'P' (petabyte, 1024T) and 'E' (exabyte, 1024P)  are
     supported. 'b' is ignored.
   'output_filename' is the destination disk image filename
   'output_fmt' is the destination format
   'options' is a comma separated list of format specific options in a
     name=value format. Use -o ? for an overview of the options supported by the
     used format
   '-c' indicates that target image must be compressed (qcow format only)
   '-u' enables unsafe rebasing. It is assumed that old and new backing file
        match exactly. The image doesn't need a working backing file before
        rebasing in this case (useful for renaming the backing file)
   '-h' with or without a command shows this help and lists the supported formats
   '-p' show progress of command (only certain commands)
   '-q' use Quiet mode - do not print any output (except errors)
   '-S' indicates the consecutive number of bytes (defaults to 4k) that must
        contain only zeros for qemu-img to create a sparse image during
        conversion. If the number of bytes is 0, the source will not be scanned for
        unallocated or zero sectors, and the destination image will always be
        fully allocated
   '--output' takes the format in which the output must be done (human or json)
   '-n' skips the target volume creation (useful if the volume is created
        prior to running qemu-img)
 Parameters to check subcommand:
   '-r' tries to repair any inconsistencies that are found during the check.
        '-r leaks' repairs only cluster leaks, whereas '-r all' fixes all
        kinds of errors, with a higher risk of choosing the wrong fix or
        hiding corruption that has already occurred.
 Parameters to snapshot subcommand:
   'snapshot' is the name of the snapshot to create, apply or delete
   '-a' applies a snapshot (revert disk to saved state)
   '-c' creates a snapshot
   '-d' deletes a snapshot
   '-l' lists all snapshots in the given image
 Parameters to compare subcommand:
   '-f' first image format
   '-F' second image format
   '-s' run in Strict mode - fail on different image size or sector allocation
 Supported formats: vvfat vpc vmdk vhdx vdi ssh sheepdog rbd raw host_cdrom host_floppy host_device file qed qcow2 qcow parallels nbd iscsi gluster dmg tftp ftps ftp https http cloop bochs blkverify blkdebug


评论前必须登录!
注册