一、OpenVPN简介
(简介内容摘自互联网)
在Linux2.4版本以上,操作系统支持一个名为tun的设备,tun设备的驱动程序中包含两个部分,一部分是字符设备驱动,一部分是网卡驱动。网卡的驱动把从TCP/IP协议栈收到的数据包结构skb放于tun设备的读取队列,用户进程通过调用字符设备接口read获得完整的IP数据包,字符驱动read函数的功能是从设备的读取队列读取数据,将核心态的skb传递给用户;反过来字符驱动write函数给用户提供了把用户态的数据写入核心态的接口,write函数把用户数据写入核心空间并穿入TCP/IP协议栈。该设备既能以字符设备的方式被读写,作为系统的虚拟网卡,也具有和物理网卡相同的特点:能够配置IP地址和路由。对虚拟网卡的使用是OpenVPN实现其SSL VPN功能的关键。
OpenVPN服务器一般需要配置一个虚拟IP地址池和一个自用的静态虚拟IP地址(静态地址和地址池必须在同一个子网中),然后为每一个成功建立SSL连接的客户端动态分配一个虚拟IP地址池中未分配的地址。这样,物理网络中的客户端和OpenVPN服务器就连接成一个虚拟网络上的星型结构局域网,OpenVPN服务器成为每个客户端在虚拟网络上的网关。OpenVPN服务器同时提供对客户端虚拟网卡的路由管理。当客户端对OpenVPN服务器后端的应用服务器的任何访问时,数据包都会经过路由流经虚拟网卡,OpenVPN程序在虚拟网卡上截获数据IP报文,然后使用SSL协议将这些IP报文封装起来,再经过物理网卡发送出去。OpenVPN的服务器和客户端在虚拟网卡之上建立起一个虚拟的局域网络,这个虚拟的局域网对系统的用户来说是透明的。
OpenVPN的服务器和客户端支持tcp和udp两种连接方式,只需在服务端和客户端预先定义好使用的连接方式(tcp或udp)和端口号,客户端和服务端在这个连接的基础上进行SSL握手。连接过程包括SSL的握手以及虚拟网络上的管理信息,OpenVPN将虚拟网上的网段、地址、路由发送给客户端。连接成功后,客户端和服务端建立起SSL安全连接,客户端和服务端的数据都流入虚拟网卡做SSL的处理,再在tcp或udp的连接上从物理网卡发送出去
二、安装部署概况
1.环境准备
本次安装OpenVPN的环境如下:
- 系统平台:CentOS Linux release 7.8.2003 (Core)
- OpenVPN 版本:Version : 2.4.9
- easy-rsa 版本:Version : 3.0.7
2.安装过程介绍
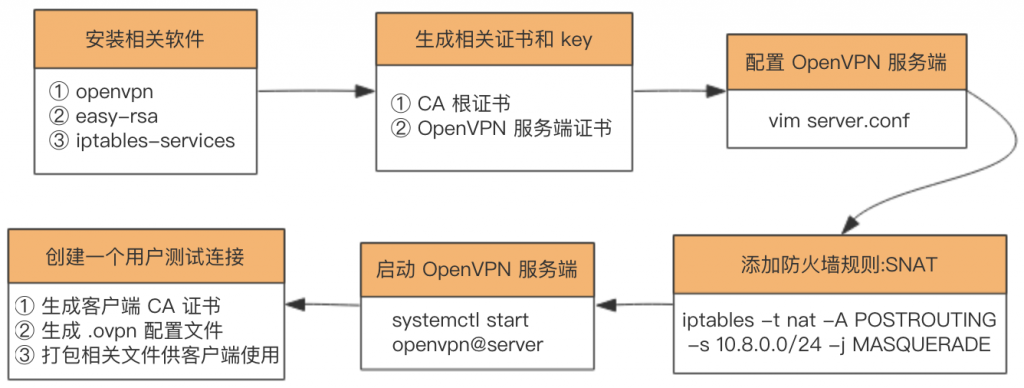
安装过程如下图所示:
三、开始安装
1..安装相关软件包
openvpn、easy-rsa、iptables-services
yum -y install epel-release
yum -y install openvpn easy-rsa iptables-services
2.创建证书
1.移动easy-rsa目录
将 easy-rsa 脚本复制到 /etc/openvpn/,该脚本主要用来方便地生成 CA 证书和各种 key
[root@master01 ~]# cp -r /usr/share/easy-rsa/ /etc/openvpn/
2.创建或编辑变量文件
在/etc/openvpn/easy-rsa/3.0.7/目录下创建vars文件(如果不存在),并添加如下内容(内容可自己定义):
[root@master01 ~]# cd /etc/openvpn/easy-rsa/3.0.7/

export KEY_COUNTRY="cn"
export KEY_PROVINCE="SH"
export KEY_CITY="SH"
export KEY_ORG="zhangqiongjie"
export KEY_EMAIL="zqj@zqj.com"
export KEY_CN=zqj
export KEY_NAME=zqj
export KEY_OU=zqj
3.使配置生效
[root@master01 3.0.7]# source ./vars
4.初始化pki目录
[root@master01 3.0.7]# ./easyrsa init-pki
5.生成CA证书
需要输入的 Common Name自己随意填写:
[root@master01 3.0.7]# ./easyrsa build-ca nopass

Note: using Easy-RSA configuration from: /etc/openvpn/easy-rsa/3.0.7/vars
Using SSL: openssl OpenSSL 1.0.2k-fips  26 Jan 2017
Generating RSA private key, 2048 bit long modulus
.............................................................................+++
...............................................................................................................................................+++
e is 65537 (0x10001)
You are about to be asked to enter information that will be incorporated
into your certificate request.
What you are about to enter is what is called a Distinguished Name or a DN.
There are quite a few fields but you can leave some blank
For some fields there will be a default value,
If you enter '.', the field will be left blank.
-----
Common Name (eg: your user, host, or server name) [Easy-RSA CA]:jakeli

CA creation complete and you may now import and sign cert requests.
Your new CA certificate file for publishing is at:
/etc/openvpn/easy-rsa/3.0.7/pki/ca.crt
6.生成 OpenVPN 服务器证书和密钥
第一个参数 server 为证书名称,可以随便起
[root@master01 3.0.7]# ./easyrsa build-server-full server nopass

Note: using Easy-RSA configuration from: /etc/openvpn/easy-rsa/3.0.7/vars
Using SSL: openssl OpenSSL 1.0.2k-fips 26 Jan 2017
Generating a 2048 bit RSA private key
...............................................................................................+++
.............................................................+++
writing new private key to '/etc/openvpn/easy-rsa/3.0.7/pki/easy-rsa-2105.ie29J8/tmp.XxmWbH'
-----
Using configuration from /etc/openvpn/easy-rsa/3.0.7/pki/easy-rsa-2105.ie29J8/tmp.o0bIts
Check that the request matches the signature
Signature ok
The Subject's Distinguished Name is as follows
commonName :ASN.1 12:'server'
Certificate is to be certified until Dec 19 13:08:48 2022 GMT (825 days)

Write out database with 1 new entries
Data Base Updated
7. 生成 Diffie-Hellman 算法需要的密钥文件
[root@master01 3.0.7]# ./easyrsa gen-dh
......
DH parameters of size 2048 created at /etc/openvpn/easy-rsa/3.0.7/pki/dh.pem
8.生成 tls-auth key
这个 key 主要用于防止 DoS 和 TLS 攻击,这一步其实是可选的,但为了安全还是生成一下,该文件在后面配置 open VPN 时会用到
[root@master01 3.0.7]# openvpn --genkey --secret ta.key
9.移动生成的证书文件
为了后续使用方便,将上面生成的相关证书文件整理到 /etc/openvpn/server/certs
[root@master01 ~]# mkdir /etc/openvpn/server/certs
[root@master01 ~]# cp /etc/openvpn/easy-rsa/3.0.7/pki/{dh.pem,ca.crt,ta.key,issued/server.crt,private/server.key} /etc/openvpn/server/certs/
10.创建OpenVPN日志目录
[root@master01 ~]# mkdir -p /var/log/openvpn
[root@master01 ~]# chown openvpn:openvpn /var/log/openvpn/
3.配置OpenVPN
1.获取配置文件
OpenVPN在如下目录中包含默认配置文件server.conf,复制到
[root@master01 ~]# cd /usr/share/doc/openvpn-2.4.9/sample/sample-config-files
[root@master01 sample-config-files]# ls
client.conf loopback-server README static-home.conf xinetd-client-config
firewall.sh office.up roadwarrior-client.conf static-office.conf xinetd-server-config
home.up openvpn-shutdown.sh roadwarrior-server.conf tls-home.conf
loopback-client openvpn-startup.sh server.conf tls-office.conf
2.修改配置文件
可以参考如下配置项进行修改,也可以直接使用下面配置选项内容作为server.conf的配置文件
port 1194   # 监听的端口号
proto udp   # 服务端用的协议,udp 能快点,所以我选择 udp
dev tun  # 生成tun0虚拟网卡
ca /etc/openvpn/server/certs/ca.crt  #   CA 根证书路径
cert /etc/openvpn/server/certs/server.crt  # open VPN 服务器证书路径
key /etc/openvpn/server/certs/server.key  # open VPN 服务器密钥路径,This file should be kept secret
dh /etc/openvpn/server/certs/dh.pem  # Diffie-Hellman 算法密钥文件路径
tls-auth /etc/openvpn/server/certs/ta.key 0 #  tls-auth key,参数 0 可以省略,如果不省略,那么客户端
# 配置相应的参数该配成 1。如果省略,那么客户端不需要 tls-auth 配置
server 10.8.0.0 255.255.255.0   # 该网段为 open VPN 虚拟网卡网段,不要和内网网段冲突即可。open VPN 默认为 10.8.0.0/24
push "dhcp-option DNS 8.8.8.8"  # DNS 服务器配置,可以根据需要指定其他 ns
push "dhcp-option DNS 8.8.4.4"
push "redirect-gateway def1"   # 客户端所有流量都通过 open VPN 转发,类似于代理开全局
compress lzo
duplicate-cn   # 允许一个用户多个终端连接
keepalive 10 120
comp-lzo
persist-key
persist-tun
user openvpn  # open VPN 进程启动用户,openvpn 用户在安装完 openvpn 后就自动生成了
group openvpn
log /var/log/openvpn/server.log  # 指定 log 文件位置
log-append /var/log/openvpn/server.log
status /var/log/openvpn/status.log
verb 3
explicit-exit-notify 1

#如果需要接入ldap,需要在server.conf下添加如下2行
#plugin /usr/lib64/openvpn/plugin/lib/openvpn-auth-ldap.so "/etc/openvpn/auth/ldap.conf cn=%u"
#client-cert-not-required
4.系统设置
1.关闭selinux
[root@master01 ~]# getenforce
Enforcing
[root@master01 ~]# setenforce 0
[root@master01 ~]# getenforce
Permissive
永久关闭(需要重启服务器生效):
[root@master01 ~]# sed -i ‘s/SELINUX=enforcing/SELINUX=disabled/g’ /etc/selinux/config
2.关闭防火墙firewalld
[root@master01 ~]# systemctl stop firewalld
[root@master01 ~]# systemctl mask firewalld  # 锁定firewalld
3.开启核心转发功能
[root@master01 ~]# echo net.ipv4.ip_forward = 1 >> /etc/sysctl.conf
[root@master01 ~]# sysctl -p
net.ipv4.ip_forward = 1
4..添加iptables规则
[root@master01 ~]# iptables -t nat -A POSTROUTING -s 10.8.0.0/24 -j MASQUERADE
持久保存:
[root@master01 ~]# more /etc/sysconfig/iptables
5.启动OpenVPN
1.启动
[root@master01 ~]# openvpn --daemon --config /etc/openvpn/server.conf
2.查看监听端口
[root@master01 ~]# netstat -tanulp | grep 1194
udp        0      0 0.0.0.0:1194            0.0.0.0:*                           1778/openvpn
四、客户端连接测试
1.创建Client端证书
[root@master01 3.0.7]# ./easyrsa build-client-full client1 nopass

Note: using Easy-RSA configuration from: /etc/openvpn/easy-rsa/3.0.7/vars
Using SSL: openssl OpenSSL 1.0.2k-fips 26 Jan 2017
Generating a 2048 bit RSA private key
.+++
..............................................................................+++
writing new private key to '/etc/openvpn/easy-rsa/3.0.7/pki/easy-rsa-1904.T8vWFV/tmp.KYO5VX'
-----
Using configuration from /etc/openvpn/easy-rsa/3.0.7/pki/easy-rsa-1904.T8vWFV/tmp.xU3CAh
Check that the request matches the signature
Signature ok
The Subject's Distinguished Name is as follows
commonName :ASN.1 12:'client1'
Certificate is to be certified until Dec 20 06:01:32 2022 GMT (825 days)

Write out database with 1 new entries
Data Base Updated
此时会在pki目录下的private和issued子目录分别生成client1.key和client1.crt文件。
2.创建客户端配置文件
可以参考如下配置项,对系统自带的client.conf配置文件进行修改(也可以直接使用如下配置内容,特别注意更改红色标注参数为自己实际参数)
client
proto udp
dev tun
remote 192.168.239.130 1194
ca ca.crt
cert client1.crt
key client1.key
tls-auth ta.key 1
remote-cert-tls server
persist-tun
persist-key
comp-lzo
verb 3
mute-replay-warnings
3.收集配置文件
分别找到如下配置文件:
/etc/openvpn/easy-rsa/3.0.7/pki/ca.crt
/etc/openvpn/easy-rsa/3.0.7/pki/ta.key
/etc/openvpn/easy-rsa/3.0.7/pki/private/client1.key
/etc/openvpn/easy-rsa/3.0.7/pki/issued/client1.crt
/etc/openvpn/client/client1.ovpn
4.Shell脚本实现上面三个步骤【推荐】
由于上面创建客户端证书比较繁琐,下面采用脚本方式一步完成上面三个过程
步骤一:创建一个客户端配置模板文件 sample.ovpn,放到 /etc/openvpn/client/ 目录,该文件在脚本中会用到,内容如下:
client
proto udp
dev tun
remote [OpenVPN服务端的公网IP地址,根据实际情况填写] 1194
ca ca.crt
cert admin.crt
key admin.key
tls-auth ta.key 1
remote-cert-tls server
persist-tun
persist-key
comp-lzo
verb 3
mute-replay-warnings
步骤二:创建ovpn_user.sh脚本自动创建用户并打包相关文件:
您暂时无权查看此隐藏内容!
执行上面脚本创建用户后,会在 /etc/openvpn/client/keys 目录下生成以用户名命名的 tar打包文件,将该压缩包下载到本地解压后即可使用。
压缩包里面文件有如下,示例:
[root@master01 keys]# tree test03
test03
├── ca.crt
├── ta.key
├── test03.crt
├── test03.key
└── test03.ovpn
5.安装windows客户端程序
Windows客户端下载
http://down.i4t.com/openvpn-install-2.4.7-I606-Win10.exe
http://down.i4t.com/openvpn-install-2.4.7-I606-Win7.exe
客户端安装完成后,安装目录下有个config文件,将收集的配置文件全部复制到config文件中,如下图:

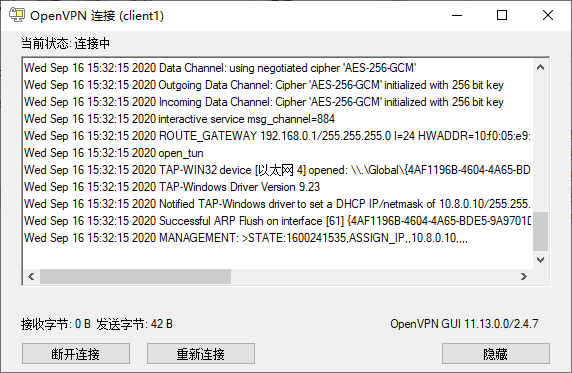
此时就可以连接测试了,如下图表示连接成功:


成功了,多谢
你好,启动OpenVPN之后我查看不到监听的1194端口,是vpn没有启动成功吗?
是的,如果正常启动后可以查看到对应的监听的端口